INDUSTRIAL HYGIENE EQUIPMENT CALIBRATION

THE H-NU PHOTOIONIZER

MIRAN 1A INFRARED PHOTOSPECTROMETER

J.KENNY, 1-92


INTRODUCTION:


The H-NU photoionizer and MIRAN 1A infrared photospectrometer finds many uses at Fermilab in measuring airborne hazards associated with organic solvents. Annual calibrations of these devices are necessary to ensure accurate field measurements.

Successful calibration of the H-NU requires a good working knowledge of the instrument through its use in the field. It is recommended that the person performing the calibration read all the H-NU literature and perform a practice calibration to familiarize him/herself with the process.


READ THIS GUIDE BEFORE STARTING A CALIBRATION.


EQUIPMENT:


1. H-NU photoionizer, with fully charged battery and both (10.2 & 11.7eV) probes and/or Foxboro Miran 1A infrared spectrometer.

2. Approximately 5 feet of 3/8-inch tygon or rubber tubing to connect the MIRAN inlet and outlet with the chamber.

3. Calibration chamber, including exhaust and mixing fans, hot plate, and ring stand w/ clip to hold the probe. (At the time of writing, the chamber is located in the 21 Shabbona chemistry lab.)

4. A supply of organic solvents of known purity. See Appendix A for a list.

5. Micro-syringes and pipettes able to measure quantities from 0.1 micro- to 3.00 milliliters with relative speed.

6. Small beakers and watch glasses. (Use ES+H glassware and pipetting equipment in the labeled box. DO NOT use any other equipment without the permission of the owner.)

7. A thermometer for temperature readings inside the chamber.

8. Tape and parafilm to seal the calibration chamber and hose connections.

9. A rubber bulb for pipetting.

10. A calculator.

11. Duct tape.

12. H-NU/MIRAN literature and documentation.

PROCEDURES:

H-NU/MIRAN calibrations take time. Since the H-NU and MIRAN calibration procedures are similar, the two devices should be calibrated simultaneously. Those performing calibrations should be somewhat familiar with basic chemical laboratory techniques.

Use a copy of the H-NU/MIRAN Calibration Checklist found in Appendix C for each calibration. Place completed checklists in the respective device file binders.

1. Before all calibrations, note and record the air temperature in the chamber.

2. •(H-NU) Install the H-NU with the probe inside the chamber. Firmly fasten the probe to the ring stand near the chamber center. Seal the probe access hole with tape.

•(MIRAN) Attach inlet and outlet hoses to the MIRAN and thread both into the chamber access hole. Inside the chamber, place an organic vapor cartridge on the ring stand mount and attach it to the end of the inlet hose. Seal the MIRAN hose connections with parafilm and the chamber access hole with tape.

Figure 1 - Top cut-away view of 21 Shabbona calibration chamber

Figure 2 - Acceptable setup of ringstand with MIRAN and H-NU hardware

NOTE: During simultaneous H-NU/MIRAN calibrations, the H-NU should be placed on a chair near the front chamber door. The small hole near the edge of this door should then be used to allow H-NU probe access to the chamber.

3. •(H-NU) Turn on the H-NU to STANDBY and allow five minutes for warm-up.

•(MIRAN) Open the MIRAN inlet and outlet vents and turn on both the MIRAN main power and fan. Allow a five minute warm-up.

4. While the devices warm up, clear the calibration chamber by opening the fan box (outdoors) and exhaust port and starting the exhaust fan.

5. Open the front chamber door to allow a good draft. The chamber should be cleared in this fashion for at least ten minutes.

6. Open several 21 Shabbona doors and windows to help clear interfering factors from the lab air.

7. While the H-NU and/or MIRAN warm up, calculate volumes needed for solvent additions to the chamber. (See Appendix A.)

8. •(H-NU) Turn the ZERO knob with the H-NU on STANDBY until the response meter reads 0. Turn the H-NU to 0-20 and record the meter response as background. This background reading should be subtracted from all subsequent readings.

•(MIRAN) Set the MIRAN to the recommended path- and wavelength for the chosen calibration factor. Then turn the RANGE knob to 0.025 and use the zero knob to zero the device. It may be necessary to flip the 1x/10x switch found just to the right of the zero knob to bring the needle into the proper range for zeroing.

9. Turn off the exhaust fan and close the exhaust port door.

•(MIRAN) Replace the organic filter cartridge on the inlet hose with a HEPA filter. Store the organic vapor cartridge in a sealed ziploc-type bag.

10. Close the chamber front door.

11. Remove a bottle of the solvent from the yellow cabinet and pour a very small amount into a 30mL beaker.

12. Immediately cover the beaker with a watch glass to reduce evaporation.

13. •(H-NU) SKIP THIS STEP UNLESS STARTING A CALIBRATION FOR A FACTOR ON THE H-NU. The first calibration point for a given factor on the H-NU should be done at the ACGIH threshold limit value (TLV) to find the proper span setting. Add to the chamber the amount of solvent (see Appendix A) that will evaporate into the TLV for that factor and turn on the hot plate and mixing fan until a stable reading is noted. Turn off the fan and hot plate. Turn the SPAN knob until the TLV or a factor of ten of the TLV is noted on the meter. (This may require adjustment of the RANGE selector.) Record the span setting and x-factor. (The x-factor is the number by which the meter-face reading must be multiplied to get the actual concentration.) Clear the chamber for 10 minutes, reseal the chamber, and proceed using the new span setting and x-factor.

14. Add the amount of solvent (to the watch glass on the chamber hot plate) that will evaporate to one-half the TLV. Initialize mixing fan and watch for the solvent to evaporate. Some solvents may require heating to evaporate entirely. (If necessary, provide for changes in chamber air temperature caused by the hot plate on the checklist.) Turn off the hot plate as the last bit of solvent evaporates.

15. Allow the chamber air to mix for five minutes.

16. Stop the mixing fan

17. Take and record the first reading. Record the readings only when the needle remains relatively motionless for >15 seconds.

18. Add the amount of solvent that will raise the solvent's chamber concentration to the TLV.

Start the mixing fan and hot plate if necessary.

19. Allow the chamber air to mix for five minutes.

20. Stop the mixing fan

21. Take and record the second reading.

22. Add the amount of solvent that will raise the solvent's chamber concentration to twice the TLV.

23. Start the mixing fan and hot plate if necessary.

24. Allow the chamber air to mix for five minutes.

25. Stop the mixing fan

26. Take and record the third and final reading.

27. Clear the chamber for 10 minutes before starting the next calibration. Spend this time making a simple graph of your data, with actual chamber solvent concentration versus concentrations shown by the H-NU and or MIRAN. Redo calibrations which yield grossly nonlinear plots. Plots for most solvents should be linear to ~300 ppm on both devices.

28. When finished calibrating for a day, return the lab to the state in which you found it. This takes approximately 45 minutes, so plan ahead.

HINTS

1. Rotate pipettes. Keep one set in a warm place to evaporate residual leftover solvent while using the other set.

2. Handle syringes briefly and only with their flanges and plungers. A micro syringe at body temperature holds less than one at room temperature.

3. Remove the plungers from the syringes and allow both barrels and plungers to dry for one hour before storing for long periods.

4. When finished calibrating, return the lab to the state in which you found it. This takes approximately 45 minutes, so plan ahead.

5. Do not return leftover solvent to the reagent bottles. Leftovers must be disposed of as hazardous waste, so pour only what is needed.


Appendix A


Densities and molecular weights of solvents used in H-NU/MIRAN calibrations.


Factor Density Molecular Weight µL/ppm*

acetone 0.79g/cc 58 2.98

chloroform 1.50 120 3.26

methyl ethyl ketone 0.81 72 3.62

dimethyl formamide 0.94 73 3.13

ethanol 0.79 46 2.35

formaldehyde(as formalin) - Varies with concentration; perform calculations with data found on reagent bottle. Use only fresh, reagent grade formalin for calibrations.

Freon 113 1.58 187 4.81

isopropanol 0.78 60 3.12

methanol 0.80 32 1.62

Stoddard/naphtha 0.97 99 4.13

xylenes 0.87 106 4.93


* For a calibration chamber of V=0.990m3, T=297K, P=750mmHg.


Appendix B

Calculating needed solvent volumes for H-NU/MIRAN calibrations.

J. Kenny, 1/92


Using the formula:


C(actual) = (XmL solv.)(r)(22.4 L/mol)(1000mg/g)

(MW)(990 L)(P/760mmHg)(273K/T)

Where: r = solvent density

MW = solvent molecular weight

P = atmospheric pressure at time of calibration (mmHg)

T = air temperature in lab at time of calibration (K)

C = chamber concentration

By setting the left hand side equal to 1 ppm and canceling terms, we simplify this to:

(0.0151mol K/mL mmHg)(MW)(P)

XmL/ppm =

rT

Choose concentrations ranging from zero to (if possible) approximately twice the ACGIH TLV.

E.g., for 1,1,1-trichloroethane (TLV=350ppm) we choose the concentrations 1, 5, 10, 50, 100, 350, 500, and 1000 ppm. Using the formula above, we calculate the volumes needed to provide these airborne concentrations when the temperature is 24ºC (75ºF) and air pressure is

29.72"Hg (755 mmHg):

(0.0151 mol K/mL mmHg)(133.5 g/mol)(755 mmHg)

X mL/ppm =

(1.34g/mL)(297K)

X = 3.82 mL/ppm

So, to make 1 ppm in the chamber, 3.82 mL must be added. For 5 ppm, we need a total of 3.82 x 5 = 19.1 mL. But since the chamber already contains 3.82 mL, we need only add 15.3 mL. A 10 ppm concentration requires the addition of another 19.1 mL 1,1,1-trichloroethane, etc.


Appendix C(MIRAN)


MIRAN CALIBRATION CHECKLIST: Place completed checklist in the MIRAN file binder.


Calibration for:

Date:

Time:

Name & ID#:


1. ___ Be sure all equipment needed for calibration is present and operable.

2. ___ Note and record the air temperature in the calibration chamber. Also record the barometric pressure in the area.


Chamber Temp. K Atmospheric Pressure mmHg


3. ___ Attach inlet and outlet hoses to the MIRAN and thread both into the chamber access hole.

4. ___ Inside the chamber, place an organic vapor cartridge on the ring stand mount and attach it to the end of the inlet hose.

5. ___ Seal the MIRAN hose connections with parafilm and the chamber access hole with tape.

6. ___ Open the MIRAN inlet and outlet vents and turn on both the MIRAN main power and fan. Allow a five minute warm-up.

7. ___ To clear calibration chamber, open fan box(outdoors), exhaust port, and chamber front door; and run exhaust fan for ten minutes.

8. ___ Open doors and windows to help clear interfering factors from the lab air.

9. ___ Calculate volumes needed for solvent additions to the chamber. (See Appendix A of the H-NU/MIRAN calibration procedures)


Volume for 1/2 TLV: µl

Volume for TLV: µl

Volume for twice TLV: µl


10. ___ Set the MIRAN to the recommended path- and wavelength for the chosen calibration factor.

11. ___ Turn the RANGE knob to 0.025 and use the zero knob to zero the device.

NOTE: It may be necessary to flip the 1x/10x switch found just to the right of the zero knob to bring the needle into the proper range for zeroing.

12. ___ Turn off exhaust fan, and close exhaust port door.

13. ___ Replace the organic filter cartridge on the inlet hose with a HEPA filter. Store the organic vapor cartridge in a sealed ziploc-type bag.

14. ___ Close the chamber front door.

15. ___ Remove a solvent from the yellow cabinet. Pour a small amount into a 30mL beaker, and cover beaker with a watch glass to reduce evaporation.

16. ___ Add the amount of solvent (to the watch glass on the chamber hot plate) that will evaporate to one-half the TLV of the solvent in use.

17. ___ Initialize mixing fan and watch for the solvent to evaporate.

NOTE: Some solvents may require heating to evaporate entirely. (If necessary, provide for changes in chamber air temperature caused by the hot plate on the checklist.) Turn off the hot plate as the last bit of solvent evaporates.


New Chamber Temperature (if different from (1.), above): K


18. ___ Stop the chamber mixing fan after approximately five minutes.

19. ___ Record the meter reading.

NOTE: Record readings only when the needle remains relatively motionless for >15 seconds.


FIRST READING:

SECOND READING:

THIRD READING:


20. ___ Add the amount of solvent that will raise the solvent's chamber concentration to the TLV.

21. ___ Repeat steps 14-16.

22. ___ Add the amount of solvent that will raise the solvent's chamber concentration to twice the TLV.

23. ___ Repeat steps 14-16.

24. ___ Clear chamber for 10 minutes before starting the next calibration.

NOTE: Spend this time making a simple graph of your data, with actual chamber solvent concentration versus concentrations shown by the MIRAN. Redo calibrations which yield grossly nonlinear plots. Plots for most solvents should be linear to ~300 ppm.

25. ___ When finished calibrating for a day, return the lab to the state in which you found it. Be sure to turn off hot plate and return equipment to proper areas.

jh/8-92


Appendix C(H-NU)


H-NU CALIBRATION CHECKLIST: Place completed checklist in the H-NU file binder.


Calibration for:

Date:

Time:

Name & ID#:


1. ___ Be sure all equipment needed for calibration is present and operable.

2. ___ Note and record the air temperature in the calibration chamber. Also record the barometric pressure in the area.

Chamber Temp. K Atmospheric Pressure mmHg


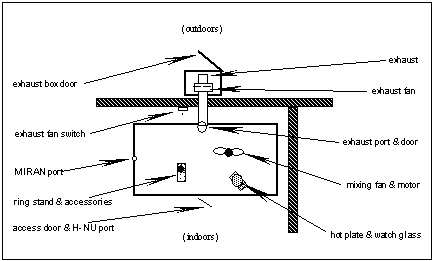
3. ___ Fasten the H-NU probe to the ring stand near the chamber center.

NOTE: During simultaneous H-NU/MIRAN calibrations, the H-NU should be placed on a chair near the front chamber door. The small hole near the edge of this door should then be used to allow H-NU probe access to the chamber.

4. ___ Turn on the H-NU to STANDBY, and allow five minutes for warm-up.

5. ___ To clear calibration chamber, open fan box(outdoors), exhaust port, and chamber front door; and run exhaust fan for ten minutes.

6. ___ Open doors and windows to help clear interfering factors from the lab air.

7. ___ Calculate volumes needed for solvent additions to the chamber. (See Appendix A of the H-NU/MIRAN calibration procedures)


Volume for 1/2 TLV: µl

Volume for TLV: µl

Volume for twice TLV: µl


8. ___ With H-NU on STANDBY, turn the ZERO knob until the response meter reads 0.

9. ___ Turn H-NU to 0-20, and record the meter response as background.

background _______

NOTE: This background reading should be subtracted from all subsequent readings.

10. ___ Turn off the exhaust fan, and close the exhaust port door.

11. ___ Close the chamber front door, and seal the probe access hole with tape.

12. ___ Remove a solvent from the yellow cabinet. Pour a small amount into a 30mL beaker and cover beaker with a watch glass to reduce evaporation.

13. ___ The first calibration point for a given factor on the H-NU should be done at the ACGIH threshold limit value (TLV) to find the proper span setting. Add to the chamber the amount of solvent (see Appendix A) that will evaporate into the TLV for that factor and turn on the hot plate and mixing fan until a stable reading is noted. Turn off the fan and hot plate. Turn the SPAN knob until the TLV or a factor of ten of the TLV is noted on the meter. (This may require adjustment of the RANGE selector.) Record the span setting and x-factor. (The x-factor is the number by which the meter-face reading must be multiplied to get the actual concentration.) Clear the chamber for 10 minutes, reseal the chamber, and proceed using the new span setting and x-factor.


New Span Setting:

New X-Factor:


14. ___ Add the amount of solvent (to the watch glass on the chamber hot plate) that will evaporate to one-half the TLV of the solvent in use.

15. ___ Initialize mixing fan and watch for the solvent to evaporate.

NOTE: Some solvents may require heating to evaporate entirely. (If necessary, provide for changes in chamber air temperature caused by the hot plate on the checklist.) Turn off the hot plate as the last bit of solvent evaporates.

New Chamber Temperature (if different from (1.), above): K


16. ___ Stop the chamber mixing fan after approximately five minutes.

17. ___ Record the meter reading.


FIRST READING:

SECOND READING:

THIRD READING:


NOTE: Record readings only when the needle remains relatively motionless for >15 seconds.

18. ___ Add the amount of solvent that will raise the solvent's chamber concentration to the TLV.

19. ___ Repeat steps 14-16.

20 ___ Add the amount of solvent that will raise the solvent's chamber concentration to twice the TLV.

21. ___ Repeat steps 14-16.

22. ___ Clear chamber for 10 minutes before starting the next calibration.

NOTE: Spend this time making a simple graph of your data, with actual chamber solvent concentration versus concentrations shown by the H-NU. Redo calibrations which yield grossly nonlinear plots. Plots for most solvents should be linear to ~300 ppm.

23. ___ When finished calibrating for a day, return the lab to the state in which you found it. Be sure to turn off hot plate and return equipment to proper areas.

jh/8-92